
1Connect to your MikroTik router with Winbox:
1.1) If you don’t have WinBox installed yet, go to https://mikrotik.com, click Software menu, then click WinBox button and select your Windows OS architecture (most probably 64-bit):

1.2) Open WinBox application, switch to Neighbors tab, then wait for your router to appear in the list, select it and click Connect.
Notice 1: By default, MikroTik routers have “admin” username with empty password set. If you have already changed admin password, enter it in the corresponding text box.
Notice 2: Your PC/laptop should be connected to your MikroTik router by any LAN port (except the first one which usually serves as WAN) or Wi-Fi.

1Setup L2TP connection:
2.1)Click on PPP menu item to the left, then click on “+” and select “L2TP Client”:

2.2) Enter connection name into corresponding text box:

2.3) Switch to “Dial Out” tab and enter your credentials:
- “Connect To” – the server name/IP address you’re given when you log in into your RapidVPN account.
- “User” – your login/username you use for your RapidVPN account.
- “Password” – your password you use for your RapidVPN account.
- “Use IPSec” – need to be turned on.
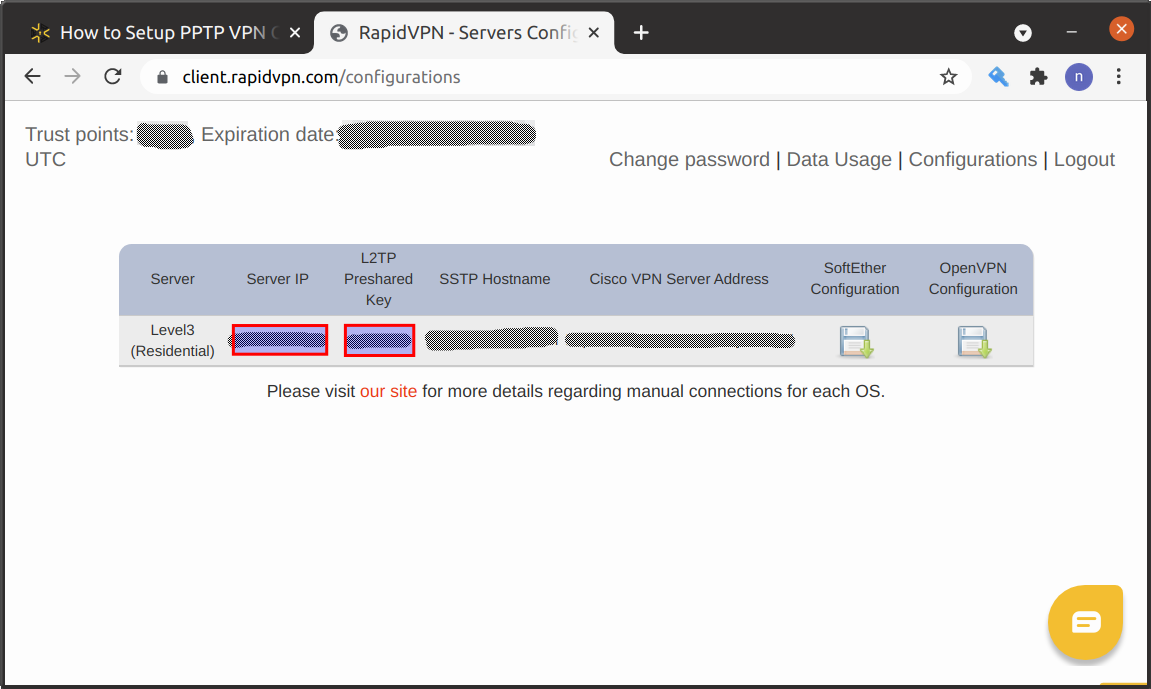
- “IPSec Secret” – enter L2TP Preshared Key from your client area on RapidVPN website.
Then click “OK” button to save.

 Wait a bit and validate that connection is up & running (have “R” to the left of its name):

Wait a bit and validate that connection is up & running (have “R” to the left of its name):
2.4) Now you need to make sure that when you send something to VPN connection, your source IP address is modified accordingly. For that, click on “IP” menu to the left and select “Firewall”. Next, switch to “NAT” tab and click “+” button to add new rule:
 In new rule window, make sure you have Chain: “srcnat” selected and then select your L2TP connection from dropdown list for “Out Interface” field:
 Then switch to “Action” tab and select “masquerade” for “Action” field. Then click “OK” button to save.

In new rule window, make sure you have Chain: “srcnat” selected and then select your L2TP connection from dropdown list for “Out Interface” field:
Then switch to “Action” tab and select “masquerade” for “Action” field. Then click “OK” button to save.
2.5) Next thing you want to do is to route all (or part) of your traffic via your new VPN connection.Proceed to “Mangle” tab of “Firewall” window and press “+” to add new rule:
 Make sure you have Chain: “prerouting” selected, then you can use one of the following fields to specify which devices should use VPN connection:
A) Specify IP addresses range in “Src. Address” text box.
B) or Select “LAN” in “In. Interface List” field.
C) or Select “bridge” in “In. Interface” field.
Make sure you have Chain: “prerouting” selected, then you can use one of the following fields to specify which devices should use VPN connection:
A) Specify IP addresses range in “Src. Address” text box.
B) or Select “LAN” in “In. Interface List” field.
C) or Select “bridge” in “In. Interface” field.
 Next switch to “Action” tab, select “mark routing” for “Action” field, and specify “RapidVPN” for “New Routing Mark”:
 Then click “OK” to save.
Now all traffic coming from selected source(s) will be processed by dedicated routing table called “RapidVPN”. Next thing we need to do is to populate this new routing table.
Go to “IP” menu and select “Routes” and click “+” button to add new item.
Then click “OK” to save.
Now all traffic coming from selected source(s) will be processed by dedicated routing table called “RapidVPN”. Next thing we need to do is to populate this new routing table.
Go to “IP” menu and select “Routes” and click “+” button to add new item.
 Next, make sure you have “0.0.0.0/0” in “Dst. Address” field. It means that you want all traffic to be routed via specified gateway. For “Gateway” select your VPN connection, and for “Routing Mark” select “RapidVPN”.
 Then click “OK” to save.
NOTICE: If you want to continue using your normal ISP connection when VPN connection is down, you can add one more similar routing rule, but specify your ISP connection as “Gateway” and enter larger value for “Distance” field (e.g. “10” instead of default “1”).
Then click “OK” to save.
NOTICE: If you want to continue using your normal ISP connection when VPN connection is down, you can add one more similar routing rule, but specify your ISP connection as “Gateway” and enter larger value for “Distance” field (e.g. “10” instead of default “1”).
Make sure you have Chain: “prerouting” selected, then you can use one of the following fields to specify which devices should use VPN connection:
A) Specify IP addresses range in “Src. Address” text box.
B) or Select “LAN” in “In. Interface List” field.
C) or Select “bridge” in “In. Interface” field.
Next switch to “Action” tab, select “mark routing” for “Action” field, and specify “RapidVPN” for “New Routing Mark”:
Then click “OK” to save.
Now all traffic coming from selected source(s) will be processed by dedicated routing table called “RapidVPN”. Next thing we need to do is to populate this new routing table.
Go to “IP” menu and select “Routes” and click “+” button to add new item.
Next, make sure you have “0.0.0.0/0” in “Dst. Address” field. It means that you want all traffic to be routed via specified gateway. For “Gateway” select your VPN connection, and for “Routing Mark” select “RapidVPN”.
Then click “OK” to save.
NOTICE: If you want to continue using your normal ISP connection when VPN connection is down, you can add one more similar routing rule, but specify your ISP connection as “Gateway” and enter larger value for “Distance” field (e.g. “10” instead of default “1”).
2.6) Check your router DNS settings
We recommend that you setup your router to use some public DNS servers like Google or OpenDNS. In order to check that, click “IP” menu and select “DNS”:
 Specify “8.8.8.8” and “8.8.4.4” as “Servers” in order to use Google DNS servers. Then click “OK” to save.
NOTICE: In some countries (such as China) Google DNS might not work, so you can set OpenDNS instead of Google DNS:
208.67.222.222
208.67.220.220
If you use DHCP to obtain DNS servers from your ISP (i.e. if you find your ISP DNS servers in “Dynamic Servers” field), you can disable corresponding DHCP option for your ISP connection. Go to “IP” – “DHCP Client” and double click on your DHCP client item:
Specify “8.8.8.8” and “8.8.4.4” as “Servers” in order to use Google DNS servers. Then click “OK” to save.
NOTICE: In some countries (such as China) Google DNS might not work, so you can set OpenDNS instead of Google DNS:
208.67.222.222
208.67.220.220
If you use DHCP to obtain DNS servers from your ISP (i.e. if you find your ISP DNS servers in “Dynamic Servers” field), you can disable corresponding DHCP option for your ISP connection. Go to “IP” – “DHCP Client” and double click on your DHCP client item:
 Switch off “Use Peer DNS” checkbox and click “OK” to save.

Specify “8.8.8.8” and “8.8.4.4” as “Servers” in order to use Google DNS servers. Then click “OK” to save.
NOTICE: In some countries (such as China) Google DNS might not work, so you can set OpenDNS instead of Google DNS:
208.67.222.222
208.67.220.220
If you use DHCP to obtain DNS servers from your ISP (i.e. if you find your ISP DNS servers in “Dynamic Servers” field), you can disable corresponding DHCP option for your ISP connection. Go to “IP” – “DHCP Client” and double click on your DHCP client item:
Switch off “Use Peer DNS” checkbox and click “OK” to save.
2.7) For extra security, you may wish to forbid any incoming connections from VPN to your router/network. If you have default MikroTik configuration, all you need to do for that is to add VPN connection to “WAN” interface list. Go to “Interfaces” menu, switch to “Interface List” tab and click “+” to add new item:
 For “List” select “WAN” and for “Interface” select your VPN connection. Then click “OK” to save.

For “List” select “WAN” and for “Interface” select your VPN connection. Then click “OK” to save.
3Setup port forwarding to client device:
3.1) Click on “IP” menu item and select “Firewall”, then switch to “NAT” tab and click “+” button to add new rule:
 Next, select “dstnat” for “Chain” field and select your VPN connection for “In. Interface” field. Fill out “Protocol” and “Dst. Port” according to your needs. This would be protocol and destination port used for external connection:
 Next, switch to “Action” tab, select “dst-nat” for “Action”, enter your target device IP address in “To Addresses” text box and optionally enter target port in “To Ports” box (if you leave it empty it would use the same port as on the screen above). Then click “OK” to save.
 You can then check if it works:
1) Run something that listens the specified port on your device (e.g. “nc -l -p 8080” on 192.168.88.254).
2) Get your VPN IP address by visiting some IP address detection service, e.g. https://v4.ident.me (for example let’s suppose it gives you 1.2.3.4)
3) Try to connect to 1.2.3.4 port 8080 (.e.g “nc 1.2.3.4 8080”)
If it’s not working:
1) Check if your device really listens to that port on all interfaces (e.g. try to connect using it’s local IP: 192.168.88.254 port 8080).
2) Check if your router firewall has a rule that accepts dst-natted traffic, like this one which should be present in the default configuration:
You can then check if it works:
1) Run something that listens the specified port on your device (e.g. “nc -l -p 8080” on 192.168.88.254).
2) Get your VPN IP address by visiting some IP address detection service, e.g. https://v4.ident.me (for example let’s suppose it gives you 1.2.3.4)
3) Try to connect to 1.2.3.4 port 8080 (.e.g “nc 1.2.3.4 8080”)
If it’s not working:
1) Check if your device really listens to that port on all interfaces (e.g. try to connect using it’s local IP: 192.168.88.254 port 8080).
2) Check if your router firewall has a rule that accepts dst-natted traffic, like this one which should be present in the default configuration:
 This rule drops all forwarding traffic coming from WAN interfaces except (that’s what exclamation sign is for) traffic which is dst-natted.
3.1) Click on “IP” menu item and select “Firewall”, then switch to “NAT” tab and click “+” button to add new rule:
Next, select “dstnat” for “Chain” field and select your VPN connection for “In. Interface” field. Fill out “Protocol” and “Dst. Port” according to your needs. This would be protocol and destination port used for external connection:
Next, switch to “Action” tab, select “dst-nat” for “Action”, enter your target device IP address in “To Addresses” text box and optionally enter target port in “To Ports” box (if you leave it empty it would use the same port as on the screen above). Then click “OK” to save.
You can then check if it works:
1) Run something that listens the specified port on your device (e.g. “nc -l -p 8080” on 192.168.88.254).
2) Get your VPN IP address by visiting some IP address detection service, e.g. https://v4.ident.me (for example let’s suppose it gives you 1.2.3.4)
3) Try to connect to 1.2.3.4 port 8080 (.e.g “nc 1.2.3.4 8080”)
If it’s not working:
1) Check if your device really listens to that port on all interfaces (e.g. try to connect using it’s local IP: 192.168.88.254 port 8080).
2) Check if your router firewall has a rule that accepts dst-natted traffic, like this one which should be present in the default configuration:
This rule drops all forwarding traffic coming from WAN interfaces except (that’s what exclamation sign is for) traffic which is dst-natted.